Events
Apr 9, 3 PM - Apr 10, 12 PM
Code the Future with AI and connect with Java peers and experts at JDConf 2025.
Register NowThis browser is no longer supported.
Upgrade to Microsoft Edge to take advantage of the latest features, security updates, and technical support.
The following documentation is a tutorial demonstrating how to govern access to a Linux system. Microsoft Entra provisions users into an on-premises LDAP directory trusted by that Linux system. This allows users to log into a Linux system that relies upon that LDAP directory for user authentication. When a user is removed from Microsoft Entra ID, they're no longer able to log into a Linux system.
Note
The scenario described in this article is only applicable for existing Linux systems that already rely upon a Name Services Switch (NSS) or Pluggable Authentication Modules (PAM) LDAP module for user identification and authentication. Linux VMs in Azure or that are Azure Arc-enabled should be instead integrated with Microsoft Entra authentication. You can now use Microsoft Entra ID as a core authentication platform and a certificate authority to SSH into a Linux VM by using Microsoft Entra ID and OpenSSH certificate-based authentication, as described in Log in to a Linux virtual machine in Azure by using Microsoft Entra ID and OpenSSH.
For other scenarios involving provisioning users into LDAP directories, other than for Linux authentication, see configuring Microsoft Entra ID to provision users into LDAP directories.
This article assumes that the LDAP server is already present in the on-premises environment, used by one or more Linux or other POSIX systems for user authentication.

A Microsoft Entra tenant with Microsoft Entra ID P1 or Premium P2 (or EMS E3 or E5).
Using this feature requires Microsoft Entra ID P1 licenses. To find the right license for your requirements, see Compare generally available features of Microsoft Entra ID.
The Hybrid Identity Administrator role for configuring the provisioning agent.
The Application Administrator or Cloud Application Administrator roles for configuring provisioning in the Azure portal or Microsoft Entra admin center.
The directory server schema requires specific attributes for each Microsoft Entra user to be provisioned to the LDAP directory, and these attributes must already be populated. In particular, each user is required to have a unique number as their User ID number. Before deploying the provisioning agent and assigning users to the directory, you need to either generate that number from an existing attribute on the user, or extend the Microsoft Entra schema. Then, you can populate that attribute on the users in scope. See Graph extensibility for how to create additional directory extensions.
The following bullet points are more recommendations and limitations.
Before deploying the connector to an existing directory server, you need to discuss with the directory server operator in your organization how to integrate with their directory server. The information to gather includes:
Deploying this connector may require changes to the configuration of the directory server as well as configuration changes to Microsoft Entra ID. For deployments involving integrating Microsoft Entra ID with a third-party directory server in a production environment, we recommend customers work with their directory server vendor, or a deployment partner for help, guidance, and support for this integration. This article uses the following sample values for OpenLDAP.
| Configuration setting | Where the value is set | Example value |
|---|---|---|
| hostname of the directory server | Configuration wizard Connectivity page | APP3 |
| port number of the directory server | Configuration wizard Connectivity page | 636. For LDAP over SSL or TLS (LDAPS), use port 636. For Start TLS, use port 389. |
| account for the connector to identify itself to the directory server | Configuration wizard Connectivity page | cn=admin,dc=contoso,dc=lab |
| password for the connector to authenticate itself to the directory server | Configuration wizard Connectivity page | |
| structural object class for a user in the directory server | Configuration wizard Object Types page | inetOrgPerson |
| auxiliary object classes for a user in the directory server | Azure portal Provisioning page attribute mappings | posixAccount andshadowAccount |
| attributes to populate on a new user | Configuration wizard Select Attributes page and Azure portal Provisioning page attribute mappings | cn, gidNumber, homeDirectory, mail, objectClass, sn, uid, uidNumber, userPassword |
| naming hierarchy required by the directory server | Azure portal Provisioning page attribute mappings | Set the DN of a newly created user to be immediately below DC=Contoso,DC=lab |
| attributes for correlating users across Microsoft Entra ID and the directory server | Azure portal Provisioning page attribute mappings | mail |
| deprovisioning behavior when a user goes out of scope in Microsoft Entra ID | Configuration wizard Deprovisioning page | Delete the user from the directory server |
The network address of a directory server is a hostname and a TCP port number, typically port 389 or 636. Except where the directory server is co-located with the connector on the same Windows Server, or you're using network level security, the network connections from the connector to a directory server need to be protected using SSL or TLS. The connector supports connecting to a directory server on port 389, and using Start TLS to enable TLS within the session. The connector also supports connecting to a directory server on port 636 for LDAPS - LDAP over TLS.
You need to have an identified account for the connector to authenticate to the directory server already configured in the directory server. This account is typically identified with a distinguished name and has an associated password or client certificate. To perform import and export operations on the objects in the connected directory, the connector account must have sufficient permissions within the directory's access control model. The connector needs to have write permissions to be able to export, and read permissions to be able to import. Permission configuration is performed within the management experiences of the target directory itself.
A directory schema specifies the object classes and attributes that represent a real-world entity in the directory. The connector supports a user being represented with a structural object class, such as inetOrgPerson, and optionally additional auxiliary object classes. For the connector to be able to provision users into the directory server, during configuration in the Azure portal you define mappings from the Microsoft Entra schema to all of the mandatory attributes. This includes the mandatory attributes of the structural object class, any superclasses of that structural object class, and the mandatory attributes of any auxiliary object classes.
You'll likely also configure mappings to some of the optional attributes of these classes. An OpenLDAP directory server with the POSIX schema to support Linux authentication might require an object for a new user to have attributes like the following example.
dn: cn=bsimon,dc=Contoso,dc=lab
objectClass: inetOrgPerson
objectClass: posixAccount
objectClass: shadowAccount
cn: bsimon
gidNumber: 10000
homeDirectory: /home/bsimon
sn: simon
uid: bsimon
uidNumber: 10011
mail: bsimon@contoso.com
userPassword: initial-password
The directory hierarchy rules implemented by a directory server describe how the objects for each user relate to each other and to existing objects in the directory. In most deployments, the organization chose to have a flat hierarchy in their directory server, in which each object for a user is located immediately below a common base object. For example, if the base distinguished name for the naming context in a directory server is dc=contoso,dc=com then a new user would have a distinguished name like cn=alice,dc=contoso,dc=com.
However, some organizations may have a more complex directory hierarchy, in which case you'll need to implement the rules when specifying the distinguished name mapping for the connector. For example, a directory server may expect users to be in organizational units by department, so a new user would have a distinguished name like cn=alice,ou=London,dc=contoso,dc=com. Since the connector doesn't create intermediate objects for organizational units, any intermediate objects the directory server rule hierarchy expects must already exist in the directory server.
Next, you'll need to define the rules for how the connector should determine if there's already a user in the directory server corresponding to a Microsoft Entra user. Every LDAP directory has a distinguished name that is unique for each object in the directory server, however that distinguished name is often not present for users in Microsoft Entra ID. Instead, an organization may have a different attribute, such as mail or employeeId, in their directory server schema that is also present on their users in Microsoft Entra ID. Then, when the connector is provisioning a new user into a directory server, the connector can search whether there's already a user in that directory that has a specific value of that attribute, and only create a new user in the directory server if one isn't present.
If your scenario involves creating new users in the LDAP directory, not just updating or deleting existing users, then you'll need to also determine how the Linux systems using that directory server handles authentication. Some systems can query a user's SSH public key or certificate from the directory, which may be appropriate of the users already hold credentials of those forms. However, if your application that relies upon the directory server doesn't support modern authentication protocols or stronger credentials, then you need to set an application-specific password when creating a new user in the directory, as Microsoft Entra ID doesn't support provisioning a user's Microsoft Entra password.
Finally, you'll need to agree on the deprovisioning behavior. When the connector is configured, and Microsoft Entra ID has linked between a user in Microsoft Entra ID and a user in the directory, either for a user already in the directory or a new user, then Microsoft Entra ID can provision attribute changes from the Microsoft Entra user into the directory.
If a user that is assigned to the application is deleted in Microsoft Entra ID, then Microsoft Entra ID sends a delete operation to the directory server. You may also wish to have Microsoft Entra ID update the object in the directory server when a user goes out of scope of being able to use the application. This behavior depends upon the application that'll be using the directory server, as many directories, such as OpenLDAP, may not have a default way of indicating a user's account is inactivated.


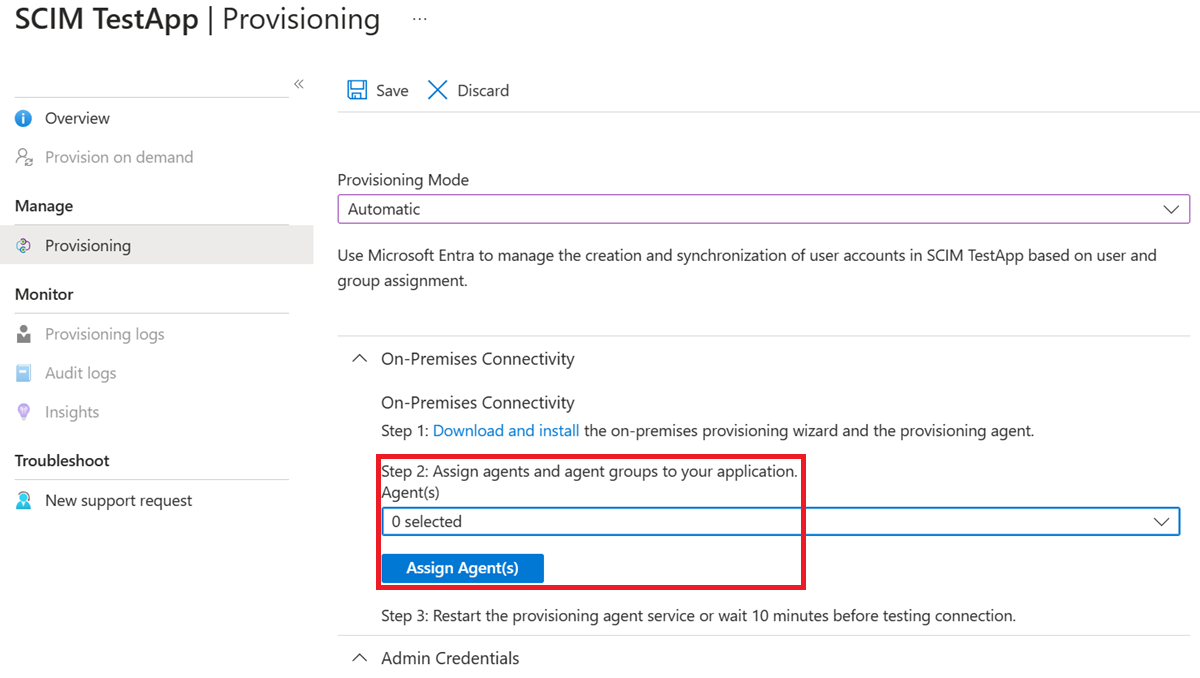
Back in the portal, on the On-Premises Connectivity section, select the agent that you deployed and select Assign Agent(s).
Keep this browser window open, as you complete the next step of configuration using the configuration wizard.

Note
If you've chosen to generate a new certificate, please record the certificate expiration date, to ensure that you schedule to return to the configuration wizard and re-generate the certificate before it expires.
Depending on the options you select, some of the wizard screens might not be available and the information might be slightly different. Use the following information to guide you in your configuration.
Generate a secret token that'll be used for authenticating Microsoft Entra ID to the connector. It should be 12 characters minimum and unique for each application. If you don't already have a secret generator, you can use a PowerShell command such as the following to generate an example random string.
-join (((48..90) + (96..122)) * 16 | Get-Random -Count 16 | % {[char]$_})
If you haven't already done so, launch the Microsoft ECMA2Host Configuration Wizard from the start menu.
Select New Connector.

On the Properties page, fill in the boxes with the values specified in the table that follows the image and select Next.

| Property | Value |
|---|---|
| Name | The name you chose for the connector, which should be unique across all connectors in your environment. For example, LDAP. |
| Autosync timer (minutes) | 120 |
| Secret Token | Enter your secret token here. It should be 12 characters minimum. |
| Extension DLL | For the generic LDAP connector, select Microsoft.IAM.Connector.GenericLdap.dll. |
On the Connectivity page, you'll configure how the ECMA Connector Host communicates with the directory server, and set some of the configuration options. Fill in the boxes with the values specified in the table that follows the image and select Next. When you select Next, the connector queries the directory server for its configuration.

| Property | Description |
|---|---|
| Host | The host name where the LDAP server is located. This sample uses APP3 as the example hostname. |
| Port | The TCP port number. If the directory server is configured for LDAP over SSL, use port 636. For Start TLS, or if you're using network-level security, use port 389. |
| Connection Timeout | 180 |
| Binding | This property specifies how the connector authenticates to the directory server. With the Basic setting, or with the SSL or TLS setting and no client certificate configured, the connector sends an LDAP simple bind to authenticate with a distinguished name and a password. With the SSL or TLS setting and a client certificate specified, the connector sends an LDAP SASL EXTERNAL bind to authenticate with a client certificate. |
| User Name | How the ECMA Connector authenticates itself to the directory server. In this example, cn=admin,dc=contoso,dc=lab |
| Password | The password of the user that the ECMA Connector authenticates itself to the directory server. |
| Realm/Domain | This setting is only required if you selected Kerberos as the Binding option, to provide the Realm/Domain of the user. |
| Certificate | The settings in this section are only used if you selected SSL or TLS as the Binding option. |
| Attribute Aliases | The attribute aliases text box is used for attributes defined in the schema with RFC4522 syntax. These attributes can't be detected during schema detection and the connector needs help with identifying those attributes. For example, if the directory server doesn't publish userCertificate;binary and you wish to provision that attribute, the following string must be entered in the attribute aliases box to correctly identify the userCertificate attribute as a binary attribute: userCertificate;binary. If you don't require any special attributes not in the schema, you can leave this blank. |
| Include operational attributes | Select the Include operational attributes in schema checkbox to also include attributes created by the directory server. These include attributes such as when the object was created and last update time. |
| Include extensible attributes | Select the Include extensible attributes in schema checkbox if extensible objects (RFC4512/4.3) are used in the directory server. Enabling this option allows every attribute to be used on all object. Selecting this option makes the schema very large so unless the connected directory is using this feature the recommendation is to keep the option unselected. |
| Allow manual anchor selection | Leave unchecked. |
Note
If you experience an issue trying to connect, and can't proceed to the Global page, ensure that the service account in the directory server is enabled.
On the Global page, you'll configure the distinguished name of the delta change log, if needed, and additional LDAP features. The page is pre-populated with the information provided by the LDAP server. Review the values shown, and then select Next.
| Property | Description |
|---|---|
| Supported SASL Mechanisms | The top section shows information provided by the server itself, including the list of SASL mechanisms. |
| Server Certificate Details | If SSL or TLS was specified, the wizard displays the certificate returned by the directory server. Confirm that the issuer, subject, and thumbprint are for the correct directory server. |
| Mandatory Features Found | The connector also verifies that the mandatory controls are present in the Root DSE. If these controls aren't listed, a warning is presented. Some LDAP directories don't list all features in the Root DSE and it's possible that the connector works without issues even if a warning is present. |
| Supported Controls | The supported controls checkboxes control the behavior for certain operations |
| Delta Import | The change log DN is the naming context used by the delta change log, for example cn=changelog. This value must be specified to be able to do delta import. If you don't need to implement delta import, then this field can be blank. |
| Password Attribute | If the directory server supports a different password attribute or password hashing, you can specify the destination for password changes. |
| Partition Names | In the additional partitions list, it's possible to add additional namespaces not automatically detected. For example, this setting can be used if several servers make up a logical cluster, which should all be imported at the same time. Just as Active Directory can have multiple domains in one forest but all domains share one schema, the same can be simulated by entering the additional namespaces in this box. Each namespace can import from different servers and is further configured on the Configure Partitions and Hierarchies page. |
On the Partitions page, keep the default and select Next.
On the Run Profiles page, ensure the Export checkbox and the Full import checkbox are both selected. Then select Next.

| Property | Description |
|---|---|
| Export | Run profile that exports data to the LDAP directory server. This run profile is required. |
| Full import | Run profile that imports all data from LDAP sources specified earlier. This run profile is required. |
| Delta import | Run profile that imports only changes from LDAP since the last full or delta import. Only enable this run profile if you've confirmed that the directory server meets the necessary requirements. For more information, see the Generic LDAP Connector reference. |
On the Export page, leave the defaults unchanged and select Next.
On the Full Import page, leave the defaults unchanged and select Next.
On the DeltaImport page, if present, leave the defaults unchanged and select Next.
On the Object Types page, fill in the boxes and select Next.
| Property | Description |
|---|---|
| Target object | This value is the structural object class of a user in the LDAP directory server. Use inetOrgPerson, and don't specify an auxiliary object class in this field. If the directory server requires auxiliary object classes, they'll be configured with the attribute mappings in the Azure portal. |
| Anchor | The values of this attribute should be unique for each object in the target directory. The Microsoft Entra provisioning service queries the ECMA connector host by using this attribute after the initial cycle. Typically use the distinguished named, which may be selected as -dn-. Multi-valued attributes, such as the uid attribute in the OpenLDAP schema, can't be used as anchors. |
| Query Attribute | This attribute should be the same as the Anchor. |
| DN | The distinguishedName of the target object. Keep -dn-. |
| Autogenerated | unchecked |
The ECMA host discovers the attributes supported by the target directory. You can choose which of those attributes you want to expose to Microsoft Entra ID. These attributes can then be configured in the Azure portal for provisioning. On the Select Attributes page, add all the attributes in the dropdown list, one at a time, that are required as mandatory attributes or that you wish to provision from Microsoft Entra ID.

The Attribute dropdown list shows any attribute that was discovered in the target directory and wasn't chosen on the previous use of the configuration wizard Select Attributes page.
Make sure that Treat as single value checkbox is unchecked for the objectClass attribute, and if userPassword is being set, is either unselectable or checked for the userPassword attribute.
Configure visibility for the following attributes.
| Attribute | Treat as single value |
|---|---|
| _distinguishedName | |
| -dn- | |
| export_password | |
| cn | Y |
| gidNumber | |
| homeDirectory | |
| Y | |
| objectClass | |
| sn | Y |
| uid | Y |
| uidNumber | |
| userPassword | Y |
Once all the relevant attributes have been added, select Next.
On the Deprovisioning page, you can specify if you wish to have Microsoft Entra ID remove users from the directory when they go out of scope of the application. If so, under Disable flow, select Delete, and under Delete flow, select Delete. If Set attribute value is chosen, the attributes selected on the previous page won't be available to select on the Deprovisioning page.
Note
If you use the Set attribute value be aware that only boolean values are allowed.
Follow these steps to confirm that the connector host is started and has identified any existing users from the directory server.

C:\Program Files\Microsoft ECMA2Host.Troubleshooting.TestECMA2HostConnection.ps1 in that directory as shown, and provide as arguments the connector name and the ObjectTypePath value cache. If your connector host isn't listening on TCP port 8585, then you may also need to provide the -Port argument as well. When prompted, type the secret token configured for that connector.
PS C:\Program Files\Microsoft ECMA2Host\Troubleshooting> $cout = .\TestECMA2HostConnection.ps1 -ConnectorName LDAP -ObjectTypePath cache; $cout.length -gt 9
Supply values for the following parameters:
SecretToken: ************
False, then the connector hasn't seen any entries in the source directory server for existing users. If this is a new directory server installation, then this behavior is to be expected, and you can continue at the next section.False, then this status indicates the connector could not read from the directory server. If you attempt to provision, then Microsoft Entra ID may not correctly match users in that source directory with users in Microsoft Entra ID. Wait several minutes for the connector host to finish reading objects from the existing directory server, and then rerun the script. If the output continues to be False, then check the configuration of your connector and the permissions in the directory server are allowing the connector to read existing users.Return to the web browser window where you were configuring the application provisioning in the portal.
Note
If the window had timed out, then you'll need to re-select the agent.
Under the Admin credentials section, enter the following URL. Replace the connectorName portion with the name of the connector on the ECMA host, such as LDAP. If you provided a certificate from your certificate authority for the ECMA host, then replace localhost with the host name of the server where the ECMA host is installed.
| Property | Value |
|---|---|
| Tenant URL | https://localhost:8585/ecma2host_connectorName/scim |
Enter the Secret Token value that you defined when you created the connector.
Note
If you just assigned the agent to the application, please wait 10 minutes for the registration to complete. The connectivity test won't work until the registration completes. Forcing the agent registration to complete by restarting the provisioning agent on your server can speed up the registration process. Go to your server, search for services in the Windows search bar, identify the Microsoft Entra Connect Provisioning Agent service, right-select the service, and restart.
Select Test Connection, and wait one minute.
After the connection test is successful and indicates that the supplied credentials are authorized to enable provisioning, select Save.

If your directory server requires additional attributes that aren't part of the default Microsoft Entra schema for users, then when provisioning you can configure to supply values of those attributes from a constant, from an expression transformed from other Microsoft Entra attributes, or by extending the Microsoft Entra schema.
If the directory server requires users to have an attribute, such as uidNumber for the OpenLDAP POSIX schema, and that attribute isn't already part of your Microsoft Entra schema for a user, and must be unique for each user, then you need to either generate that attribute from other attributes of the user via an expression, or use the directory extension feature to add that attribute as an extension.
If your users originate in Active Directory Domain Services and have the attribute in that directory, you can use Microsoft Entra Connect or Microsoft Entra Connect cloud sync. This will configure the attribute to be synched from Active Directory Domain Services to Microsoft Entra ID, making it available for provisioning to other systems.
If your users originate in Microsoft Entra ID, you need to define a directory extension for each new attribute to store on a user. Then, update the Microsoft Entra users that are planned to be provisioned, to give each user a value of those attributes.
In this section, you'll configure the mapping between the Microsoft Entra user's attributes and the attributes that you previously selected in the ECMA Host configuration wizard. Later, when the connector creates an object in a directory server, the Microsoft Entra user attributes are sent through the connector to the directory server to be part of that new object.
In the Microsoft Entra admin center, under Enterprise applications, select the On-premises ECMA app application, and then select the Provisioning page.
Select Edit provisioning.
Expand Mappings and select Provision Microsoft Entra users. If this is the first time you've configured the attribute mappings for this application, there's only one mapping present as a placeholder.
To confirm that the schema of the directory server is available in Microsoft Entra ID, select the Show advanced options checkbox and select Edit attribute list for ScimOnPremises. Ensure that all the attributes selected in the configuration wizard are listed. If not, then wait several minutes for the schema to refresh, then select Attribute Mapping in the navigation line, and then select Edit attribute list for ScimOnPremises again to reload the page. Once you see the attributes listed, then cancel from this page to return to the mappings list.
Every user in a directory must have a unique distinguished name. You can specify how the connector should construct a distinguished name by using an attribute mapping. Select Add New Mapping. Use the following values to create the mapping, changing the distinguished names in the expression to match that of the organizational unit or other container in your target directory.
Join("", "CN=", Word([userPrincipalName], 1, "@"), ",DC=Contoso,DC=lab")urn:ietf:params:scim:schemas:extension:ECMA2Host:2.0:User:-dn-If the directory server requires multiple structural object class values, or auxiliary object class values, to be supplied in the objectClass attribute, then add a mapping to that attribute. To add a mapping for objectClass, select Add New Mapping. Use the following values to create the mapping, changing the object class names in the expression to match that of the target directory schema.
Split("inetOrgPerson,posixAccount,shadowAccount",",")urn:ietf:params:scim:schemas:extension:ECMA2Host:2.0:User:objectClassFor each of the mappings in the following table for your directory server, Select Add New Mapping, and specify the source and target attributes. If you're provisioning into an existing directory with existing users, you need to edit the mapping for the attribute that is in common to set the Match objects using this attribute for that attribute. Learn more about attribute mapping here.
For OpenLDAP with the POSIX schema, you'll also need to supply the gidNumber, homeDirectory, uid and uidNumber attributes. Each user requires a unique uid and a unique uidNumber. Typically the homeDirectory is set by an expression derived from the user's userID. For example, if the uid of a user is generated by an expression derived from their user principal name, then the value for that user's home directory could be generated by a similar expression also derived from their user principal name. And depending on your use case you may wish to have all the users be in the same group, so would assign the gidNumber from a constant.
| Mapping type | Source attribute | Target attribute |
|---|---|---|
| Direct | displayName |
urn:ietf:params:scim:schemas:extension:ECMA2Host:2.0:User:cn |
| Direct | surname |
urn:ietf:params:scim:schemas:extension:ECMA2Host:2.0:User:sn |
| Direct | userPrincipalName |
urn:ietf:params:scim:schemas:extension:ECMA2Host:2.0:User:mail |
| Expression | ToLower(Word([userPrincipalName], 1, "@"), ) |
urn:ietf:params:scim:schemas:extension:ECMA2Host:2.0:User:uid |
| Direct | (attribute specific to your directory) | urn:ietf:params:scim:schemas:extension:ECMA2Host:2.0:User:uidNumber |
| Expression | Join("/", "/home", ToLower(Word([userPrincipalName], 1, "@"), )) |
urn:ietf:params:scim:schemas:extension:ECMA2Host:2.0:User:homeDirectory |
| Constant | 10000 |
urn:ietf:params:scim:schemas:extension:ECMA2Host:2.0:User:gidNumber |
Add a mapping to urn:ietf:params:scim:schemas:extension:ECMA2Host:2.0:User:userPassword that sets an initial random password for the user.
Select Save.
If there are people who have existing user accounts in the LDAP directory, then you need to ensure that the Microsoft Entra user representation has the attributes required for matching.
If you're planning on creating new users in the LDAP directory, then you need to ensure that the Microsoft Entra representations of those users have the source attributes required by the user schema of the target directory. Each user requires a unique uid and a unique uidNumber.
If your users originate in Active Directory Domain Services, and has the attribute in that directory, then you can use Microsoft Entra Connect or Microsoft Entra Connect cloud sync to configure that the attribute should be synched from Active Directory Domain Services to Microsoft Entra ID, so that it's available for provisioning to other systems.
If your users originate in Microsoft Entra ID, then for each new attribute you need to store on a user, you'll define a directory extension. Then, update the Microsoft Entra users that are planned to be provisioned, to give each user a value of those attributes.
Once you've the users updated in Microsoft Entra ID, you can use the Microsoft Graph PowerShell cmdlets to automate checking users have all the required attributes.
For example, suppose your provisioning required users to have three attributes DisplayName,surname and extension_656b1c479a814b1789844e76b2f459c3_MyNewProperty. This third attribute is used to contain the uidNumber. You could use the Get-MgUser cmdlet to retrieve each user and check if the required attributes are present. Note that the Graph v1.0 Get-MgUser cmdlet, by default, doesn't return any of a user's directory extension attributes, unless the attributes are specified in the request as one of the properties to return.
This section shows how to interact with Microsoft Entra ID by using Microsoft Graph PowerShell cmdlets.
The first time your organization uses these cmdlets for this scenario, you need to be in a Global Administrator role to allow Microsoft Graph PowerShell to be used in your tenant. Subsequent interactions can use a lower-privileged role, such as:
Open PowerShell.
If you don't have the Microsoft Graph PowerShell modules already installed, install the Microsoft.Graph.Users module and others by using this command:
Install-Module Microsoft.Graph
If you already have the modules installed, ensure that you're using a recent version:
Update-Module microsoft.graph.users,microsoft.graph.identity.governance,microsoft.graph.applications
Connect to Microsoft Entra ID:
$msg = Connect-MgGraph -ContextScope Process -Scopes "User.Read.All,Application.ReadWrite.All,AppRoleAssignment.ReadWrite.All,EntitlementManagement.ReadWrite.All"
Construct the list of users, and the attributes to check.
$userPrincipalNames = (
 "alice@contoso.com",
 "bob@contoso.com",
 "carol@contoso.com" )

$requiredBaseAttributes = ("DisplayName","surname")
$requiredExtensionAttributes = ("extension_656b1c479a814b1789844e76b2f459c3_MyNewProperty")
Query the directory for each of the users.
$select = "id"
foreach ($a in $requiredExtensionAttributes) { $select += ","; $select += $a;}
foreach ($a in $requiredBaseAttributes) { $select += ","; $select += $a;}

foreach ($un in $userPrincipalNames) {
   $nu = Get-MgUser -UserId $un -Property $select -ErrorAction Stop
   foreach ($a in $requiredBaseAttributes) { if ($nu.$a -eq $null) { write-output "$un missing $a"} }
   foreach ($a in $requiredExtensionAttributes) { if ($nu.AdditionalProperties.ContainsKey($a) -eq $false) { write-output "$un missing $a" } }
}
Identify which of the users in that directory are in scope for being users with Linux authentication. This choice will depend on your Linux system's configuration. For some configurations, any user who exists in an LDAP directory is a valid user. Other configurations might require the user to have a particular attribute or be a member of a group in that directory.
Run a command that retrieves that subset of users from your LDAP directory into a CSV file. Ensure that the output includes the attributes of users that are used for matching with Microsoft Entra ID. Examples of these attributes are employee ID, account name or uid, and email address.
If needed, transfer the CSV file that contains the list of users to a system with the Microsoft Graph PowerShell cmdlets installed.
Now that you've a list of all the users obtained from the directory, you'll match those users from the directory with users in Microsoft Entra ID. Before you proceed, review the information about matching users in the source and target systems.
This section shows how to interact with Microsoft Entra ID by using Microsoft Graph PowerShell cmdlets.
The first time your organization uses these cmdlets for this scenario, you need to be in a Global Administrator role to allow Microsoft Graph PowerShell to be used in your tenant. Subsequent interactions can use a lower-privileged role, such as:
Open PowerShell.
If you don't have the Microsoft Graph PowerShell modules already installed, install the Microsoft.Graph.Users module and others by using this command:
Install-Module Microsoft.Graph
If you already have the modules installed, ensure that you're using a recent version:
Update-Module microsoft.graph.users,microsoft.graph.identity.governance,microsoft.graph.applications
Connect to Microsoft Entra ID:
$msg = Connect-MgGraph -ContextScope Process -Scopes "User.ReadWrite.All,Application.ReadWrite.All,AppRoleAssignment.ReadWrite.All,EntitlementManagement.ReadWrite.All"
If this is the first time you have used this command, you may need to consent to allow the Microsoft Graph Command Line tools to have these permissions.
Read the list of users obtained from the application's data store into the PowerShell session. If the list of users was in a CSV file, you can use the PowerShell cmdlet Import-Csv and provide the name of the file from the previous section as an argument.
For example, if the file obtained from SAP Cloud Identity Services is named Users-exported-from-sap.csv and is located in the current directory, enter this command.
$filename = ".\Users-exported-from-sap.csv"
$dbusers = Import-Csv -Path $filename -Encoding UTF8
For another example if you are using a database or directory, if the file is named users.csv and located in the current directory, enter this command:
$filename = ".\users.csv"
$dbusers = Import-Csv -Path $filename -Encoding UTF8
Choose the column of the users.csv file that will match with an attribute of a user in Microsoft Entra ID.
If you are using SAP Cloud Identity Services, then the default mapping is the SAP SCIM attribute userName with the Microsoft Entra ID attribute userPrincipalName:
$db_match_column_name = "userName"
$azuread_match_attr_name = "userPrincipalName"
For another example if you are using a database or directory, you might have users in a database where the value in the column named EMail is the same value as in the Microsoft Entra attribute userPrincipalName:
$db_match_column_name = "EMail"
$azuread_match_attr_name = "userPrincipalName"
Retrieve the IDs of those users in Microsoft Entra ID.
The following PowerShell script uses the $dbusers, $db_match_column_name, and $azuread_match_attr_name values specified earlier. It will query Microsoft Entra ID to locate a user that has an attribute with a matching value for each record in the source file. If there are many users in the file obtained from the source SAP Cloud Identity Services, database, or directory, this script might take several minutes to finish. If you don't have an attribute in Microsoft Entra ID that has the value, and need to use a contains or other filter expression, then you will need to customize this script and that in step 11 below to use a different filter expression.
$dbu_not_queried_list = @()
$dbu_not_matched_list = @()
$dbu_match_ambiguous_list = @()
$dbu_query_failed_list = @()
$azuread_match_id_list = @()
$azuread_not_enabled_list = @()
$dbu_values = @()
$dbu_duplicate_list = @()

foreach ($dbu in $dbusers) {
   if ($null -ne $dbu.$db_match_column_name -and $dbu.$db_match_column_name.Length -gt 0) {
      $val = $dbu.$db_match_column_name
      $escval = $val -replace "'","''"
      if ($dbu_values -contains $escval) { $dbu_duplicate_list += $dbu; continue } else { $dbu_values += $escval }
      $filter = $azuread_match_attr_name + " eq '" + $escval + "'"
      try {
         $ul = @(Get-MgUser -Filter $filter -All -Property Id,accountEnabled -ErrorAction Stop)
         if ($ul.length -eq 0) { $dbu_not_matched_list += $dbu; } elseif ($ul.length -gt 1) {$dbu_match_ambiguous_list += $dbu } else {
            $id = $ul[0].id;
            $azuread_match_id_list += $id;
            if ($ul[0].accountEnabled -eq $false) {$azuread_not_enabled_list += $id }
         }
      } catch { $dbu_query_failed_list += $dbu }
    } else { $dbu_not_queried_list += $dbu }
}
View the results of the previous queries. See if any of the users in SAP Cloud Identity Services, the database, or directory couldn't be located in Microsoft Entra ID, because of errors or missing matches.
The following PowerShell script will display the counts of records that weren't located:
$dbu_not_queried_count = $dbu_not_queried_list.Count
if ($dbu_not_queried_count -ne 0) {
  Write-Error "Unable to query for $dbu_not_queried_count records as rows lacked values for $db_match_column_name."
}
$dbu_duplicate_count = $dbu_duplicate_list.Count
if ($dbu_duplicate_count -ne 0) {
  Write-Error "Unable to locate Microsoft Entra ID users for $dbu_duplicate_count rows as multiple rows have the same value"
}
$dbu_not_matched_count = $dbu_not_matched_list.Count
if ($dbu_not_matched_count -ne 0) {
  Write-Error "Unable to locate $dbu_not_matched_count records in Microsoft Entra ID by querying for $db_match_column_name values in $azuread_match_attr_name."
}
$dbu_match_ambiguous_count = $dbu_match_ambiguous_list.Count
if ($dbu_match_ambiguous_count -ne 0) {
  Write-Error "Unable to locate $dbu_match_ambiguous_count records in Microsoft Entra ID as attribute match ambiguous."
}
$dbu_query_failed_count = $dbu_query_failed_list.Count
if ($dbu_query_failed_count -ne 0) {
  Write-Error "Unable to locate $dbu_query_failed_count records in Microsoft Entra ID as queries returned errors."
}
$azuread_not_enabled_count = $azuread_not_enabled_list.Count
if ($azuread_not_enabled_count -ne 0) {
 Write-Error "$azuread_not_enabled_count users in Microsoft Entra ID are blocked from sign-in."
}
if ($dbu_not_queried_count -ne 0 -or $dbu_duplicate_count -ne 0 -or $dbu_not_matched_count -ne 0 -or $dbu_match_ambiguous_count -ne 0 -or $dbu_query_failed_count -ne 0 -or $azuread_not_enabled_count) {
 Write-Output "You will need to resolve those issues before access of all existing users can be reviewed."
}
$azuread_match_count = $azuread_match_id_list.Count
Write-Output "Users corresponding to $azuread_match_count records were located in Microsoft Entra ID."
When the script finishes, it will indicate an error if any records from the data source weren't located in Microsoft Entra ID. If not all the records for users from the application's data store could be located as users in Microsoft Entra ID, you'll need to investigate which records didn't match and why.
For example, someone's email address and userPrincipalName might have been changed in Microsoft Entra ID without their corresponding mail property being updated in the application's data source. Or, the user might have already left the organization but is still in the application's data source. Or there might be a vendor or super-admin account in the application's data source that does not correspond to any specific person in Microsoft Entra ID.
If there were users who couldn't be located in Microsoft Entra ID, or weren't active and able to sign in, but you want to have their access reviewed or their attributes updated in SAP Cloud Identity Services, the database, or directory, you'll need to update the application, the matching rule, or update or create Microsoft Entra users for them. For more information on which change to make, see manage mappings and user accounts in applications that did not match to users in Microsoft Entra ID.
If you choose the option of creating users in Microsoft Entra ID, you can create users in bulk by using either:
Ensure that these new users are populated with the attributes required for Microsoft Entra ID to later match them to the existing users in the application, and the attributes required by Microsoft Entra ID, including userPrincipalName, mailNickname and displayName. The userPrincipalName must be unique among all the users in the directory.
For example, you might have users in a database where the value in the column named EMail is the value you want to use as the Microsoft Entra user principal Name, the value in the column Alias contains the Microsoft Entra ID mail nickname, and the value in the column Full name contains the user's display name:
$db_display_name_column_name = "Full name"
$db_user_principal_name_column_name = "Email"
$db_mail_nickname_column_name = "Alias"
Then you can use this script to create Microsoft Entra users for those in SAP Cloud Identity Services, the database, or directory that didn't match with users in Microsoft Entra ID. Note that you may need to modify this script to add additional Microsoft Entra attributes needed in your organization, or if the $azuread_match_attr_name is neither mailNickname nor userPrincipalName, in order to supply that Microsoft Entra attribute.
$dbu_missing_columns_list = @()
$dbu_creation_failed_list = @()
foreach ($dbu in $dbu_not_matched_list) {
   if (($null -ne $dbu.$db_display_name_column_name -and $dbu.$db_display_name_column_name.Length -gt 0) -and
       ($null -ne $dbu.$db_user_principal_name_column_name -and $dbu.$db_user_principal_name_column_name.Length -gt 0) -and
       ($null -ne $dbu.$db_mail_nickname_column_name -and $dbu.$db_mail_nickname_column_name.Length -gt 0)) {
      $params = @{
         accountEnabled = $false
         displayName = $dbu.$db_display_name_column_name
         mailNickname = $dbu.$db_mail_nickname_column_name
         userPrincipalName = $dbu.$db_user_principal_name_column_name
         passwordProfile = @{
           Password = -join (((48..90) + (96..122)) * 16 | Get-Random -Count 16 | % {[char]$_})
         }
      }
      try {
        New-MgUser -BodyParameter $params
      } catch { $dbu_creation_failed_list += $dbu; throw }
   } else {
      $dbu_missing_columns_list += $dbu
   }
}
After you add any missing users to Microsoft Entra ID, run the script from step 7 again. Then run the script from step 8. Check that no errors are reported.
$dbu_not_queried_list = @()
$dbu_not_matched_list = @()
$dbu_match_ambiguous_list = @()
$dbu_query_failed_list = @()
$azuread_match_id_list = @()
$azuread_not_enabled_list = @()
$dbu_values = @()
$dbu_duplicate_list = @()

foreach ($dbu in $dbusers) {
   if ($null -ne $dbu.$db_match_column_name -and $dbu.$db_match_column_name.Length -gt 0) {
      $val = $dbu.$db_match_column_name
      $escval = $val -replace "'","''"
      if ($dbu_values -contains $escval) { $dbu_duplicate_list += $dbu; continue } else { $dbu_values += $escval }
      $filter = $azuread_match_attr_name + " eq '" + $escval + "'"
      try {
         $ul = @(Get-MgUser -Filter $filter -All -Property Id,accountEnabled -ErrorAction Stop)
         if ($ul.length -eq 0) { $dbu_not_matched_list += $dbu; } elseif ($ul.length -gt 1) {$dbu_match_ambiguous_list += $dbu } else {
            $id = $ul[0].id;
            $azuread_match_id_list += $id;
            if ($ul[0].accountEnabled -eq $false) {$azuread_not_enabled_list += $id }
         }
      } catch { $dbu_query_failed_list += $dbu }
    } else { $dbu_not_queried_list += $dbu }
}

$dbu_not_queried_count = $dbu_not_queried_list.Count
if ($dbu_not_queried_count -ne 0) {
  Write-Error "Unable to query for $dbu_not_queried_count records as rows lacked values for $db_match_column_name."
}
$dbu_duplicate_count = $dbu_duplicate_list.Count
if ($dbu_duplicate_count -ne 0) {
  Write-Error "Unable to locate Microsoft Entra ID users for $dbu_duplicate_count rows as multiple rows have the same value"
}
$dbu_not_matched_count = $dbu_not_matched_list.Count
if ($dbu_not_matched_count -ne 0) {
  Write-Error "Unable to locate $dbu_not_matched_count records in Microsoft Entra ID by querying for $db_match_column_name values in $azuread_match_attr_name."
}
$dbu_match_ambiguous_count = $dbu_match_ambiguous_list.Count
if ($dbu_match_ambiguous_count -ne 0) {
  Write-Error "Unable to locate $dbu_match_ambiguous_count records in Microsoft Entra ID as attribute match ambiguous."
}
$dbu_query_failed_count = $dbu_query_failed_list.Count
if ($dbu_query_failed_count -ne 0) {
  Write-Error "Unable to locate $dbu_query_failed_count records in Microsoft Entra ID as queries returned errors."
}
$azuread_not_enabled_count = $azuread_not_enabled_list.Count
if ($azuread_not_enabled_count -ne 0) {
 Write-Warning "$azuread_not_enabled_count users in Microsoft Entra ID are blocked from sign-in."
}
if ($dbu_not_queried_count -ne 0 -or $dbu_duplicate_count -ne 0 -or $dbu_not_matched_count -ne 0 -or $dbu_match_ambiguous_count -ne 0 -or $dbu_query_failed_count -ne 0 -or $azuread_not_enabled_count -ne 0) {
 Write-Output "You will need to resolve those issues before access of all existing users can be reviewed."
}
$azuread_match_count = $azuread_match_id_list.Count
Write-Output "Users corresponding to $azuread_match_count records were located in Microsoft Entra ID."
Now that you've the Microsoft Entra ECMA Connector Host talking with Microsoft Entra ID, and the attribute mapping configured, you can move on to configuring who's in scope for provisioning.
Important
If you were signed in using a Hybrid Identity Administrator role, you need to sign-out and sign-in with an account that has at least the Application Administrator role for this section. The Hybrid Identity Administrator role doesn't have permissions to assign users to applications.
If there are existing users in the LDAP directory, then you should create application role assignments for those existing users. To learn more about how to create application role assignments in bulk using New-MgServicePrincipalAppRoleAssignedTo, see governing an application's existing users in Microsoft Entra ID.
If you don't wish to update existing users in the LDAP directory yet, then select a test user from Microsoft Entra ID who has the required attributes and will be provisioned to the directory server.


Now that your attributes are mapped and an initial user is assigned, you can test on-demand provisioning with one of your users.
On the server the running the Microsoft Entra ECMA Connector Host, select Start.
Enter run and enter services.msc in the box.
In the Services list, ensure that both the Microsoft Entra Connect Provisioning Agent service and the Microsoft ECMA2Host services are running. If not, select Start.
In the Azure portal, select Enterprise applications.
Select the On-premises ECMA app application.
On the left, select Provisioning.
Select Provision on demand.
Search for one of your test users, and select Provision.

After several seconds, then the message Successfully created user in target system will appear, with a list of the user attributes. If an error appears instead, see troubleshooting provisioning errors.
After the test of on-demand provisioning is successful, add the remaining users. To learn more about how to create application role assignments in bulk using New-MgServicePrincipalAppRoleAssignedTo, see governing an application's existing users in Microsoft Entra ID.
If an error is shown, then select View provisioning logs. Look in the log for a row in which the Status is Failure, and select on that row.
If the error message is Failed to create User, then check the attributes that are shown against the requirements of the directory schema.
For more information, change to the Troubleshooting & Recommendations tab.
If the troubleshooting error message includes that an objectClass value is invalid per syntax, then ensure that the provisioning attribute mapping to the objectClass attribute includes only names of object classes recognized by the directory server.
For other errors, see troubleshooting on-premises application provisioning.
If you wish to pause provisioning to this application, on the provisioning configuration page, you can change the provisioning status to Off, and select Save. This action stops the provisioning service from running in the future.
After waiting, check the directory server to ensure users are being provisioned. The query you perform to the directory server will depend on what commands your directory server provides.
The following instructions illustrate how to check OpenLDAP on Linux.
ldapsearch -D "cn=admin,dc=contoso,dc=lab" -W -s sub -b dc=contoso,dc=lab -LLL (objectclass=inetOrgPerson)Events
Apr 9, 3 PM - Apr 10, 12 PM
Code the Future with AI and connect with Java peers and experts at JDConf 2025.
Register Now