路徑幾何概觀
本主題描述如何使用 Direct2D 路徑幾何來建立複雜的繪圖。 其中包含下列各節。
- 必要條件
- Direct2D 中的路徑幾何
- 使用 ID2D1GeometrySink 來填入幾何路徑
-
範例:建立複雜的繪圖
- 為左山建立路徑幾何
- 為右山建立路徑幾何
- 為太陽建立路徑幾何
- 建立河 的路徑幾何
- 將路徑幾何呈現至顯示
- 相關主題
先決條件
本概觀假設您已熟悉建立基本的 Direct2D 應用程式,如 建立簡單的 Direct2D 應用程式中所述。 它也假設您已熟悉 Direct2D 幾何的基本功能,如 Geometries 概觀中所述。
Direct2D 中的路徑幾何
路徑幾何是由 ID2D1PathGeometry 介面表示。 若要具現化路徑幾何,請呼叫 ID2D1Factory::CreatePathGeometry 方法。 這些物件可用來描述由弧線、曲線和線條等區段組成的複雜幾何圖形。 若要使用圖形和區段填入路徑幾何,請呼叫 Open 方法來取得 ID2D1GeometrySink,並使用 geometry sink 的方法將圖形和區段新增至路徑幾何。
使用ID2D1GeometrySink填入路徑幾何
ID2D1GeometrySink 描述可包含線條、弧線、立方貝塞爾曲線和二次方貝塞爾曲線的幾何路徑。
幾何匯入由一或多個圖形所組成。 每個圖表是由一或多個線條、曲線或弧線段所組成。 若要建立圖表,請呼叫 BeginFigure 方法、傳入圖形的起點,然後使用其 Add 方法(例如 AddLine 和 AddBezier)來新增區段。 當您完成新增區段時,請呼叫 EndFigure 方法。 您可以重複此順序來建立其他圖形。 當您完成建立圖形時,請呼叫 Close 方法。
範例:建立複雜的繪圖
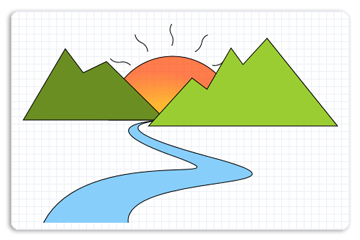
下圖顯示具有線條、弧線和貝塞爾曲線的複雜繪圖。 下列程式代碼範例示範如何使用四個路徑幾何物件來建立繪圖,一個用於左山,一個用於右山,一個用於河流,另一個用於具有耀斑的太陽。
建立左山的路徑幾何
此範例會先建立左山的路徑幾何,如下圖所示。
為了建立左山,此範例會呼叫 ID2D1Factory::CreatePathGeometry 方法來建立 ID2D1PathGeometry。
hr = m_pD2DFactory->CreatePathGeometry(&m_pLeftMountainGeometry);
然後,此範例會使用 Open 方法來從 ID2D1PathGeometry 取得幾何接收器,並將它儲存在 pSink 變數中。
ID2D1GeometrySink *pSink = NULL;
hr = m_pLeftMountainGeometry->Open(&pSink);
然後,此範例會呼叫 BeginFigure,並傳入 D2D1_FIGURE_BEGIN_FILLED,指出此數位已填滿, 然後呼叫 AddLines,傳入 D2D1_POINT_2F 點數組,(267、177)、(236、192)、(212、160)、(156、255)和(346、255)。
下列程式代碼示範如何執行這項作。
pSink->SetFillMode(D2D1_FILL_MODE_WINDING);

pSink->BeginFigure(
    D2D1::Point2F(346,255),
    D2D1_FIGURE_BEGIN_FILLED
    );
D2D1_POINT_2F points[5] = {
   D2D1::Point2F(267, 177),
   D2D1::Point2F(236, 192),
   D2D1::Point2F(212, 160),
   D2D1::Point2F(156, 255),
   D2D1::Point2F(346, 255),
   };
pSink->AddLines(points, ARRAYSIZE(points));
pSink->EndFigure(D2D1_FIGURE_END_CLOSED);
建立右山的路徑幾何
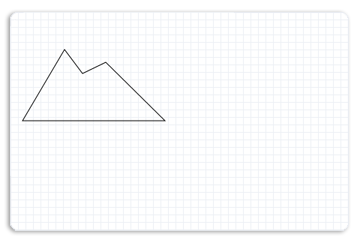
然後,此範例會為右山建立另一個路徑幾何,其中包含點 (481、146)、(449、181)、(433、159)、(401、214)、(381、199)、(323、263)和(575、263)。 下圖展示了右側山的顯示方式。
插圖顯示一個描繪山形的多邊形
下列程式代碼示範如何執行這項作。
        hr = m_pD2DFactory->CreatePathGeometry(&m_pRightMountainGeometry);
        if(SUCCEEDED(hr))
        {
            ID2D1GeometrySink *pSink = NULL;

            hr = m_pRightMountainGeometry->Open(&pSink);
            if (SUCCEEDED(hr))
            {
                pSink->SetFillMode(D2D1_FILL_MODE_WINDING);

                pSink->BeginFigure(
                    D2D1::Point2F(575,263),
                    D2D1_FIGURE_BEGIN_FILLED
                    );
                D2D1_POINT_2F points[] = {
                   D2D1::Point2F(481, 146),
                   D2D1::Point2F(449, 181),
                   D2D1::Point2F(433, 159),
                   D2D1::Point2F(401, 214),
                   D2D1::Point2F(381, 199),
                   D2D1::Point2F(323, 263),
                   D2D1::Point2F(575, 263)
                   };
                pSink->AddLines(points, ARRAYSIZE(points));
                pSink->EndFigure(D2D1_FIGURE_END_CLOSED);
            }
            hr = pSink->Close();

            SafeRelease(&pSink);
       }
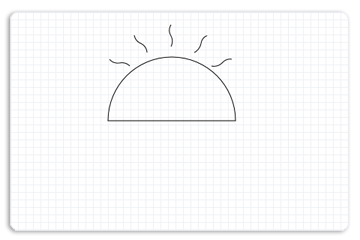
建立太陽的路徑幾何
此範例接著會填入太陽的另一個路徑幾何,如下圖所示。
若要這樣做,路徑幾何會建立一個匯點,並將弧的圖形和每個光暈的圖形新增至該匯點。 藉由重複執行序列 BeginFigure,其 Add 方法(例如 AddBezier)以及 EndFigure,可以將多個圖形新增至接收器。
下列程式代碼示範如何執行這項作。
        hr = m_pD2DFactory->CreatePathGeometry(&m_pSunGeometry);
        if(SUCCEEDED(hr))
        {
            ID2D1GeometrySink *pSink = NULL;

            hr = m_pSunGeometry->Open(&pSink);
            if (SUCCEEDED(hr))
            {
                pSink->SetFillMode(D2D1_FILL_MODE_WINDING);

                pSink->BeginFigure(
                    D2D1::Point2F(270, 255),
                    D2D1_FIGURE_BEGIN_FILLED
                    );
                pSink->AddArc(
                    D2D1::ArcSegment(
                        D2D1::Point2F(440, 255), // end point
                        D2D1::SizeF(85, 85),
                        0.0f, // rotation angle
                        D2D1_SWEEP_DIRECTION_CLOCKWISE,
                        D2D1_ARC_SIZE_SMALL
                        ));
                pSink->EndFigure(D2D1_FIGURE_END_CLOSED);

                pSink->BeginFigure(
                    D2D1::Point2F(299, 182),
                    D2D1_FIGURE_BEGIN_HOLLOW
                    );
                pSink->AddBezier(
                   D2D1::BezierSegment(
                       D2D1::Point2F(299, 182),
                       D2D1::Point2F(294, 176),
                       D2D1::Point2F(285, 178)
                       ));
                pSink->AddBezier(
                   D2D1::BezierSegment(
                       D2D1::Point2F(276, 179),
                       D2D1::Point2F(272, 173),
                       D2D1::Point2F(272, 173)
                       ));
                pSink->EndFigure(D2D1_FIGURE_END_OPEN);

                pSink->BeginFigure(
                    D2D1::Point2F(354, 156),
                    D2D1_FIGURE_BEGIN_HOLLOW
                    );
                pSink->AddBezier(
                   D2D1::BezierSegment(
                       D2D1::Point2F(354, 156),
                       D2D1::Point2F(358, 149),
                       D2D1::Point2F(354, 142)
                       ));
                pSink->AddBezier(
                   D2D1::BezierSegment(
                       D2D1::Point2F(349, 134),
                       D2D1::Point2F(354, 127),
                       D2D1::Point2F(354, 127)
                       ));
                pSink->EndFigure(D2D1_FIGURE_END_OPEN);

                pSink->BeginFigure(
                    D2D1::Point2F(322,164),
                    D2D1_FIGURE_BEGIN_HOLLOW
                    );
                pSink->AddBezier(
                   D2D1::BezierSegment(
                       D2D1::Point2F(322, 164),
                       D2D1::Point2F(322, 156),
                       D2D1::Point2F(314, 152)
                       ));
                pSink->AddBezier(
                   D2D1::BezierSegment(
                       D2D1::Point2F(306, 149),
                       D2D1::Point2F(305, 141),
                       D2D1::Point2F(305, 141)
                       ));
                pSink->EndFigure(D2D1_FIGURE_END_OPEN);

                pSink->BeginFigure(
                    D2D1::Point2F(385, 164),
                    D2D1_FIGURE_BEGIN_HOLLOW
                    );
                pSink->AddBezier(
                   D2D1::BezierSegment(
                       D2D1::Point2F(385,164),
                       D2D1::Point2F(392,161),
                       D2D1::Point2F(394,152)
                       ));
                pSink->AddBezier(
                   D2D1::BezierSegment(
                       D2D1::Point2F(395,144),
                       D2D1::Point2F(402,141),
                       D2D1::Point2F(402,142)
                       ));
                pSink->EndFigure(D2D1_FIGURE_END_OPEN);

                pSink->BeginFigure(
                    D2D1::Point2F(408,182),
                    D2D1_FIGURE_BEGIN_HOLLOW
                    );
                pSink->AddBezier(
                   D2D1::BezierSegment(
                       D2D1::Point2F(408,182),
                       D2D1::Point2F(416,184),
                       D2D1::Point2F(422,178)
                       ));
                pSink->AddBezier(
                   D2D1::BezierSegment(
                       D2D1::Point2F(428,171),
                       D2D1::Point2F(435,173),
                       D2D1::Point2F(435,173)
                       ));
                pSink->EndFigure(D2D1_FIGURE_END_OPEN);
            }
            hr = pSink->Close();

            SafeRelease(&pSink);
       }
建立河道幾何
然後,此範例會為包含貝塞爾曲線的河流建立另一個幾何路徑。 下圖顯示河流的顯示方式。
貝塞爾曲線顯示河流的插圖
下列程式代碼示範如何執行這項作。
        hr = m_pD2DFactory->CreatePathGeometry(&m_pRiverGeometry);

        if(SUCCEEDED(hr))
        {
            ID2D1GeometrySink *pSink = NULL;

            hr = m_pRiverGeometry->Open(&pSink);
            if (SUCCEEDED(hr))
            {
                pSink->SetFillMode(D2D1_FILL_MODE_WINDING);
                pSink->BeginFigure(
                    D2D1::Point2F(183, 392),
                    D2D1_FIGURE_BEGIN_FILLED
                    );
                pSink->AddBezier(
                   D2D1::BezierSegment(
                       D2D1::Point2F(238, 284),
                       D2D1::Point2F(472, 345),
                       D2D1::Point2F(356, 303)
                       ));
                pSink->AddBezier(
                   D2D1::BezierSegment(
                       D2D1::Point2F(237, 261),
                       D2D1::Point2F(333, 256),
                       D2D1::Point2F(333, 256)
                       ));
                pSink->AddBezier(
                   D2D1::BezierSegment(
                       D2D1::Point2F(335, 257),
                       D2D1::Point2F(241, 261),
                       D2D1::Point2F(411, 306)
                       ));
                pSink->AddBezier(
                   D2D1::BezierSegment(
                       D2D1::Point2F(574, 350),
                       D2D1::Point2F(288, 324),
                       D2D1::Point2F(296, 392)
                       ));
                pSink->EndFigure(D2D1_FIGURE_END_OPEN);
            }
將路徑幾何呈現至顯示器
下列程式代碼示範如何在顯示器上呈現填入的路徑幾何。 它首先繪製太陽的形狀,接著左山的形狀,然後是河流的形狀,最後是右山的形狀。
 m_pRenderTarget->BeginDraw();

 m_pRenderTarget->SetTransform(D2D1::Matrix3x2F::Identity());

 m_pRenderTarget->Clear(D2D1::ColorF(D2D1::ColorF::White));

 D2D1_SIZE_F rtSize = m_pRenderTarget->GetSize();
 m_pRenderTarget->FillRectangle(
     D2D1::RectF(0, 0, rtSize.width, rtSize.height),
     m_pGridPatternBitmapBrush
     );

 m_pRenderTarget->FillGeometry(m_pSunGeometry, m_pRadialGradientBrush);

 m_pSceneBrush->SetColor(D2D1::ColorF(D2D1::ColorF::Black, 1.f));
 m_pRenderTarget->DrawGeometry(m_pSunGeometry, m_pSceneBrush, 1.f);

 m_pSceneBrush->SetColor(D2D1::ColorF(D2D1::ColorF::OliveDrab, 1.f));
 m_pRenderTarget->FillGeometry(m_pLeftMountainGeometry, m_pSceneBrush);

 m_pSceneBrush->SetColor(D2D1::ColorF(D2D1::ColorF::Black, 1.f));
 m_pRenderTarget->DrawGeometry(m_pLeftMountainGeometry, m_pSceneBrush, 1.f);

 m_pSceneBrush->SetColor(D2D1::ColorF(D2D1::ColorF::LightSkyBlue, 1.f));
 m_pRenderTarget->FillGeometry(m_pRiverGeometry, m_pSceneBrush);

 m_pSceneBrush->SetColor(D2D1::ColorF(D2D1::ColorF::Black, 1.f));
 m_pRenderTarget->DrawGeometry(m_pRiverGeometry, m_pSceneBrush, 1.f);

 m_pSceneBrush->SetColor(D2D1::ColorF(D2D1::ColorF::YellowGreen, 1.f));
 m_pRenderTarget->FillGeometry(m_pRightMountainGeometry, m_pSceneBrush);

 m_pSceneBrush->SetColor(D2D1::ColorF(D2D1::ColorF::Black, 1.f));
 m_pRenderTarget->DrawGeometry(m_pRightMountainGeometry, m_pSceneBrush, 1.f);


 hr = m_pRenderTarget->EndDraw();
完整範例會輸出下圖。
相關主題