Customize email in flows
Here are the top how-to scenarios for email in Microsoft Power Automate, with examples of how to achieve them.
- Send a beautifully formatted email.
- Add an image to your email.
- Send email to a distribution list.
- Send automatic replies from a shared mailbox.
- Change the date and time format of an email.
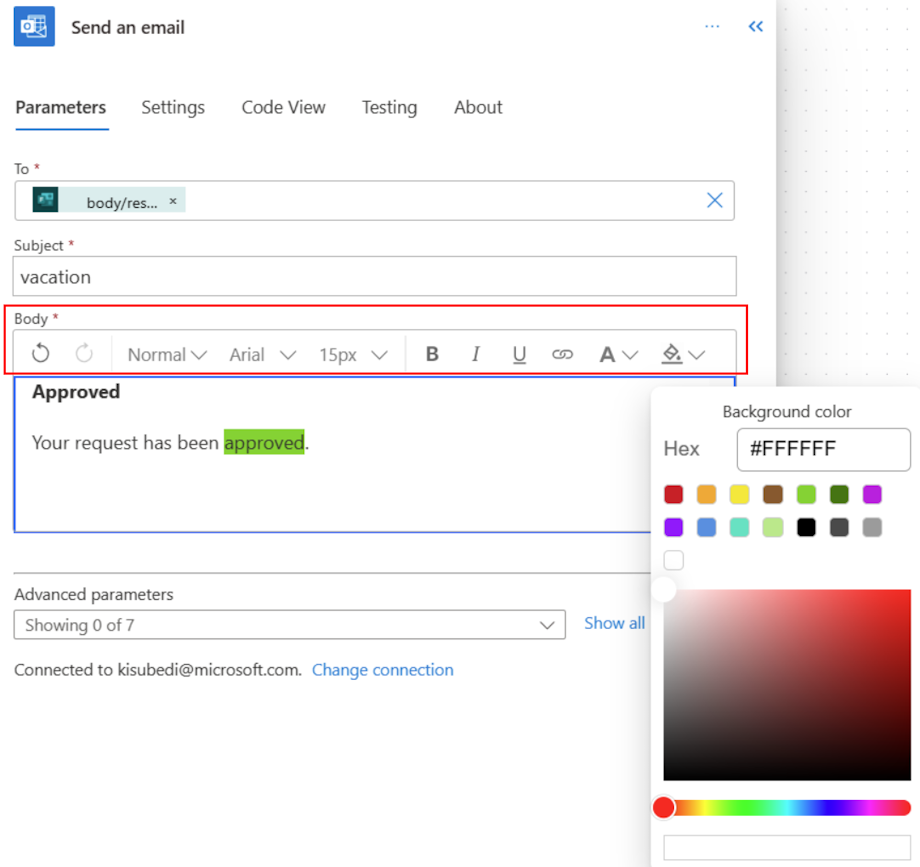
Send a beautifully formatted email
You can use HTML to beautify your email. Following are two options that you can use to beautify your messages with HTML.
Note
- Power Automate uses either the classic cloud flows designer or the new modern designer with Copilot capabilities. To identify which designer you’re using, go to the Note section in Explore the cloud flows designer.
- When you switch between the classic and new designer, you're asked to save your flow. You can't save and switch until all errors are resolved.
[This topic is prerelease documentation and is subject to change.]
In the Edit with Copilot designer, you can simply format the email body with rich controls like bold, italics, headers, and more.

Add an image to your email
Outlook takes the image you included in your email and converts it to plain text. Instead of copying/pasting the plain text into Power Automate, follow these steps:
Upload the image to cloud-based storage, such as Google Drive or OneDrive for Business.
Get the anonymous visitor URL to the image.
In the Power Automate Send an email action, do the following:
Go to the HTML section of the rich text editor.
Look for <image src= in the HTML.
Change the value of the src property to the URL of the image from the cloud-based storage provider where you uploaded the image.
Your src should be similar to: <image src="https://url/to/your/images.png"/>.
Important
Inline images are limited to a size of 100 KB. This might affect the quality of the image.
Send email to a distribution list
The Send an email action can send messages to an email-enabled security group or distribution list. Each member of the email-enabled security group or distribution list receives the email in their group mailbox rather than their own mailbox.
Alternatively, follow these steps if you want users to receive the email in their mailbox.
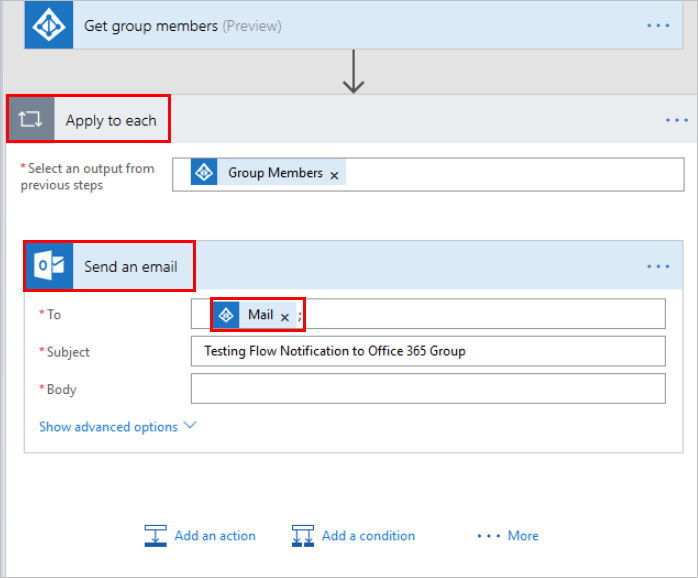
Add the Get group members action from the Microsoft Entra ID connector, and then select the distribution list.
Under the action Microsoft Entra ID-Get group members, add an Apply to each action.
Inside the Apply to each action, add the Send an email action, and then add the group members from the Get group members action as dynamic content in the To field.
Send automatic replies from a shared mailbox
You can do this in the web version of Outlook.
- Sign in to the web version of Outlook at https://outlook.office365.com with your Office 365 credentials.
- Select your profile image (or placeholder image) in the upper-right corner.
- Select Open another mailbox.
- Enter the name or email address of the shared mailbox, and then select it.
- Select Settings in the upper-right corner, and then select Automatic replies.
- Configure your automatic reply.
Change the date and time format of an email
By default, the email you receive shows the Coordinated Universal Time (UTC) time zone. However, your users might want to change it to their local time zone. For instructions, go to Converting time zone in Microsoft Power Automate to convert the time zone.