إظهار الاتجاهات من A إلى B
توضح لك هذه المقالة كيفية تقديم طلب مسار وإظهار المسار على الخريطة.
هناك طريقتان لفعل ذلك. الطريقة الأولى هي الاستعلام عن واجهة برمجة تطبيقات Get Route Directions باستخدام TypeScript REST SDK @azure-rest/maps-route. الطريقة الثانية هي استخدام واجهة برمجة التطبيقات Fetch لإجراء طلب بحث إلى واجهة برمجة تطبيقات Get Route Directions . يتم وصف كلا النهجين في هذه المقالة.
الاستعلام عن المسار عبر REST SDK
import * as atlas from "azure-maps-control";
import MapsRoute, { toColonDelimitedLatLonString } from "@azure-rest/maps-route";
import "azure-maps-control/dist/atlas.min.css";

const onload = () => {
  // Initialize a map instance.
  const map = new atlas.Map("map", {
    view: "Auto",
    // Add authentication details for connecting to Azure Maps.
    authOptions: {
      // Use Azure Active Directory authentication.
      authType: "aad",
      clientId: "<Your Azure Maps Client Id>",
      aadAppId: "<Your Azure Active Directory Client Id>",
      aadTenant: "<Your Azure Active Directory Tenant Id>"
    }
  });

  map.events.add("load", async () => {
    // Use the access token from the map and create an object that implements the TokenCredential interface.
    const credential = {
      getToken: () => {
        return {
          token: map.authentication.getToken()
        };
      }
    };

    // Create a Route client.
    const client = MapsRoute(credential, "<Your Azure Maps Client Id>");

    // Create a data source and add it to the map.
    const dataSource = new atlas.source.DataSource();
    map.sources.add(dataSource);

    // Create the GeoJSON objects which represent the start and end points of the route.
    const startPoint = new atlas.data.Feature(new atlas.data.Point([-122.130137, 47.644702]), {
      title: "Redmond",
      icon: "pin-blue"
    });

    const endPoint = new atlas.data.Feature(new atlas.data.Point([-122.3352, 47.61397]), {
      title: "Seattle",
      icon: "pin-round-blue"
    });

    // Add the data to the data source.
    dataSource.add([startPoint, endPoint]);

    // Create a layer for rendering the route line under the road labels.
    map.layers.add(
      new atlas.layer.LineLayer(dataSource, null, {
        strokeColor: "#2272B9",
        strokeWidth: 5,
        lineJoin: "round",
        lineCap: "round"
      }),
      "labels"
    );

    // Create a layer for rendering the start and end points of the route as symbols.
    map.layers.add(
      new atlas.layer.SymbolLayer(dataSource, null, {
        iconOptions: {
          image: ["get", "icon"],
          allowOverlap: true,
          ignorePlacement: true
        },
        textOptions: {
          textField: ["get", "title"],
          offset: [0, 1.2]
        },
        filter: ["any", ["==", ["geometry-type"], "Point"], ["==", ["geometry-type"], "MultiPoint"]] //Only render Point or MultiPoints in this layer.
      })
    );

    // Get the coordinates of the start and end points.
    const coordinates = [
      [startPoint.geometry.coordinates[1], startPoint.geometry.coordinates[0]],
      [endPoint.geometry.coordinates[1], endPoint.geometry.coordinates[0]]
    ];

    // Get the route directions between the start and end points.
    const response = await client.path("/route/directions/{format}", "json").get({
      queryParameters: {
        query: toColonDelimitedLatLonString(coordinates)
      }
    });

    // Get the GeoJSON feature collection of the route.
    const data = getFeatures(response.body.routes);

    // Add the route data to the data source.
    dataSource.add(data);

    // Update the map view to center over the route.
    map.setCamera({
      bounds: data.bbox,
      padding: 40
    });
  });
};

/**
 * Helper function to convert a route response into a GeoJSON FeatureCollection.
 */
const getFeatures = (routes) => {
  const bounds = [];
  const features = routes.map((route, index) => {
    const multiLineCoords = route.legs.map((leg) => {
      return leg.points.map((coord) => {
        const position = [coord.longitude, coord.latitude];
        bounds.push(position);
        return position;
      });
    });

    // Include all properties on the route object except legs.
    // Legs is used to create the MultiLineString, so we only need the summaries.
    // The legSummaries property replaces the legs property with just summary data.
    const props = {
      ...route,
      legSummaries: route.legs.map((leg) => leg.summary),
      resultIndex: index
    };
    delete props.legs;

    return {
      type: "Feature",
      geometry: {
        type: "MultiLineString",
        coordinates: multiLineCoords
      },
      properties: props
    };
  });

  return {
    type: "FeatureCollection",
    features: features,
    bbox: new atlas.data.BoundingBox.fromLatLngs(bounds)
  };
};

document.body.onload = onload;
في مثال التعليمات البرمجية السابق، تقوم الكتلة الأولى بإنشاء كائن خريطة وتعيين آلية المصادقة لاستخدام معرف Microsoft Entra. يمكنك الاطلاع على إنشاء خريطة للحصول على الإرشادات.
تنشئ الكتلة الثانية من التعليمات البرمجية كائنا ينفذ واجهة TokenCredential لمصادقة طلبات HTTP خرائط Azure مع الرمز المميز للوصول. ثم يمرر كائن بيانات الاعتماد إلى الخرائط Route وينشئ مثيلا للعميل.
تقوم الكتلة الثالثة من التعليمات البرمجية بإنشاء كائن DataSource وإضافته إلى الخريطة.
تنشئ الكتلة الرابعة من التعليمات البرمجية كائنات نقاط البداية والنهاية وتضيفها إلى الكائن dataSource.
الخط هو ميزة لـ LineString. يعرض LineLayer كائنات الخط الموجودة في DataSource في صورة خطوط على الخريطة. تقوم الكتلة الرابعة من التعليمات البرمجية بإنشاء طبقة خط وإضافتها إلى الخريطة. راجع خصائص طبقة الخط في LinetringLayerOptions.
تستخدم طبقة الرمز نصوصًا أو أيقونات لعرض البيانات المستندة إلى النقطة الموجودة في DataSource. يتم عرض النصوص أو الأيقونات كرموز على الخريطة. تقوم الكتلة الخامسة من التعليمات البرمجية بإنشاء وإضافة طبقة رمز إلى الخريطة.
تقوم الكتلة السادسة من التعليمات البرمجية بالاستعلام عن خدمة توجيه خرائط Azure، والتي تعد جزءا من عميل الخرائط Route. يتم استخدام طلب GET للحصول على مسار بين نقطتي البداية والنهاية. ثم يتم استخراج مجموعة ميزات GeoJSON من الاستجابة باستخدام دالة getFeatures() مساعد وإضافتها إلى مصدر البيانات. ثم تعرض الاستجابة كمسار على الخريطة. لمزيد من المعلومات حول إضافة خط إلى الخريطة، راجع إضافة خط على الخريطة.
تعين الكتلة الأخيرة من التعليمات البرمجية حدود الخريطة باستخدام خاصية setCamera الخاصة بالخريطة.
يتم إنشاء استعلام المسار ومصدر البيانات والرمز وطبقات الخط وحدود الكاميرا داخل مستمع الحدث. تضمن بنية التعليمات البرمجية هذه عرض النتائج فقط بعد تحميل الخريطة بالكامل.
الاستعلام عن المسار عبر واجهة برمجة تطبيقات إحضار
import * as atlas from "azure-maps-control";
import "azure-maps-control/dist/atlas.min.css";

const onload = () => {
  // Initialize a map instance.
  const map = new atlas.Map("map", {
    view: "Auto",
    // Add authentication details for connecting to Azure Maps.
    authOptions: {
      // Use Azure Active Directory authentication.
      authType: "aad",
      clientId: "<Your Azure Maps Client Id>",
      aadAppId: "<Your Azure Active Directory Client Id>",
      aadTenant: "<Your Azure Active Directory Tenant Id>"
    }
  });

  map.events.add("load", async () => {
    // Create a data source and add it to the map.
    const dataSource = new atlas.source.DataSource();
    map.sources.add(dataSource);

    // Create the GeoJSON objects which represent the start and end points of the route.
    const startPoint = new atlas.data.Feature(new atlas.data.Point([-122.130137, 47.644702]), {
      title: "Redmond",
      icon: "pin-blue"
    });

    const endPoint = new atlas.data.Feature(new atlas.data.Point([-122.3352, 47.61397]), {
      title: "Seattle",
      icon: "pin-round-blue"
    });

    // Add the data to the data source.
    dataSource.add([startPoint, endPoint]);

    // Create a layer for rendering the route line under the road labels.
    map.layers.add(
      new atlas.layer.LineLayer(dataSource, null, {
        strokeColor: "#2272B9",
        strokeWidth: 5,
        lineJoin: "round",
        lineCap: "round"
      }),
      "labels"
    );

    // Create a layer for rendering the start and end points of the route as symbols.
    map.layers.add(
      new atlas.layer.SymbolLayer(dataSource, null, {
        iconOptions: {
          image: ["get", "icon"],
          allowOverlap: true,
          ignorePlacement: true
        },
        textOptions: {
          textField: ["get", "title"],
          offset: [0, 1.2]
        },
        filter: ["any", ["==", ["geometry-type"], "Point"], ["==", ["geometry-type"], "MultiPoint"]] //Only render Point or MultiPoints in this layer.
      })
    );

    // Send a request to the route API
    let url = "https://atlas.microsoft.com/route/directions/json?";
    url += "&api-version=1.0";
    url +=
      "&query=" +
      startPoint.geometry.coordinates[1] +
      "," +
      startPoint.geometry.coordinates[0] +
      ":" +
      endPoint.geometry.coordinates[1] +
      "," +
      endPoint.geometry.coordinates[0];

    // Process request
    fetch(url, {
      headers: {
        Authorization: "Bearer " + map.authentication.getToken(),
        "x-ms-client-id": "<Your Azure Maps Client Id>"
      }
    })
      .then((response) => response.json())
      .then((response) => {
        const bounds = [];
        const route = response.routes[0];

        // Create an array to store the coordinates of each turn
        let routeCoordinates = [];
        route.legs.forEach((leg) => {
          const legCoordinates = leg.points.map((point) => {
            const position = [point.longitude, point.latitude];
            bounds.push(position);
            return position;
          });
          // Add each turn coordinate to the array
          routeCoordinates = routeCoordinates.concat(legCoordinates);
        });

        // Add route line to the dataSource
        dataSource.add(new atlas.data.Feature(new atlas.data.LineString(routeCoordinates)));

        // Update the map view to center over the route.
        map.setCamera({
          bounds: new atlas.data.BoundingBox.fromLatLngs(bounds),
          padding: 40
        });
      });
  });
};

document.body.onload = onload;
في مثال التعليمات البرمجية السابق، تقوم الكتلة الأولى من التعليمات البرمجية بإنشاء كائن خريطة وتعيين آلية المصادقة لاستخدام معرف Microsoft Entra. يمكنك الاطلاع على إنشاء خريطة للحصول على الإرشادات.
تقوم الكتلة الثانية من التعليمات البرمجية بإنشاء وإضافة كائن DataSource إلى الخريطة.
تنشئ كتلة التعليمات البرمجية الثالثة نقاط البدء والوجهة للمسار. ثم تضيفها إلى مصدر البيانات. لمزيد من المعلومات، راجع إضافة دبوس على الخريطة.
يعرض LineLayer كائنات الخط الموجودة في DataSource في صورة خطوط على الخريطة. تقوم الكتلة الرابعة من التعليمات البرمجية بإنشاء طبقة خط وإضافتها إلى الخريطة. راجع خصائص طبقة الخط في LineLayerOptions.
تستخدم طبقة الرموز نصا أو أيقونات لعرض البيانات المستندة إلى النقطة المغلفة في DataSource كرمز على الخريطة. تقوم الكتلة الخامسة من التعليمات البرمجية بإنشاء وإضافة طبقة رمز إلى الخريطة. راجع خصائص طبقة رمز في SymbolLayerOptions.
تستخدم الكتلة التالية من التعليمات البرمجية واجهة برمجة التطبيقات Fetch لإجراء طلب بحث للحصول على توجيهات المسار. ثم يتم تحليل الاستجابة. إذا كانت الاستجابة ناجحة، يتم استخدام معلومات خط الطول والعرض لإنشاء صفيف لكل خط عن طريق توصيل هاتين النقطتين. ثم تتم إضافة بيانات الخط إلى مصدر بيانات لعرض المسار على الخريطة. لمزيد من المعلومات، راجع إضافة خط على الخريطة.
تعين الكتلة الأخيرة من التعليمات البرمجية حدود الخريطة باستخدام خاصية setCamera الخاصة بالخريطة.
يتم إنشاء استعلام المسار ومصدر البيانات والرمز وطبقات الخط وحدود الكاميرا داخل مستمع الحدث. مرة أخرى، نريد التأكد من عرض النتائج بعد تحميل الخريطة بالكامل.
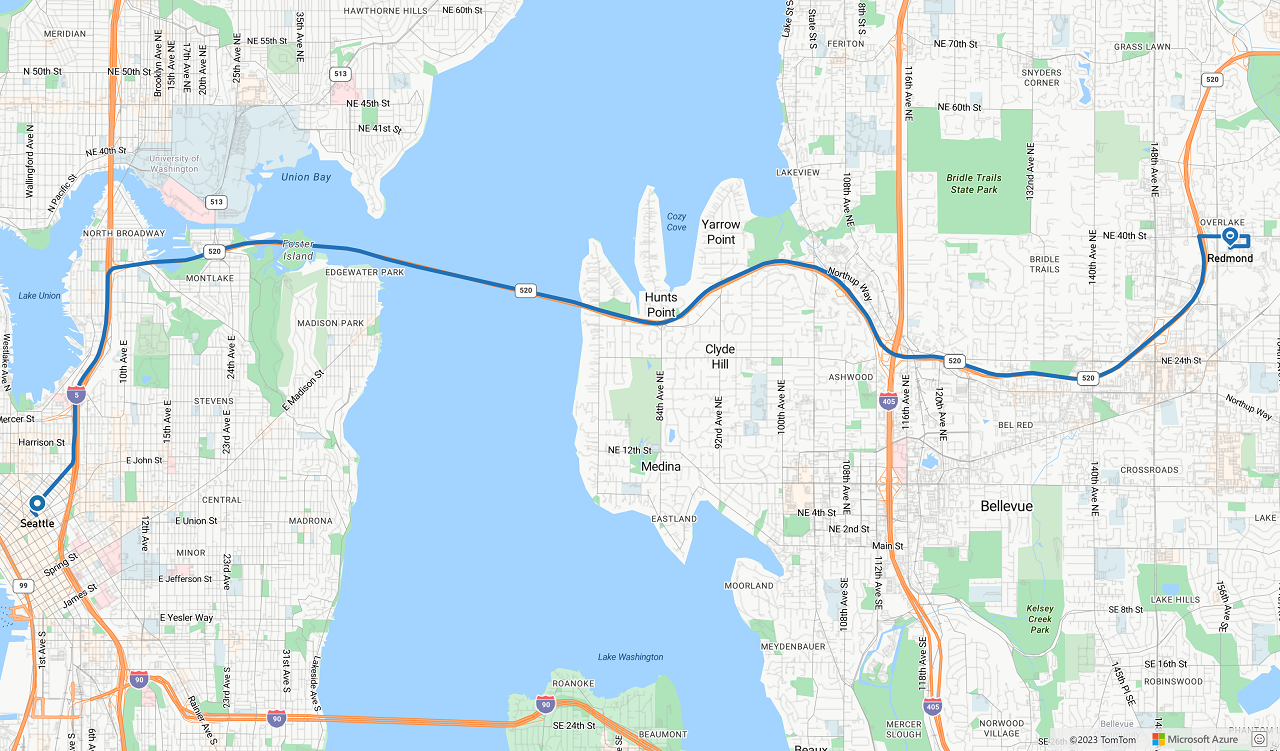
الصورة التالية هي لقطة شاشة تعرض نتائج نموذجي التعليمات البرمجية.
الخطوات التالية
تعرّف على المزيد حول الفئات والأساليب المُستخدمة في هذه المقالة:
راجع المقالات التالية للحصول على أمثلة التعليمة البرمجية الكاملة: